
 View larger

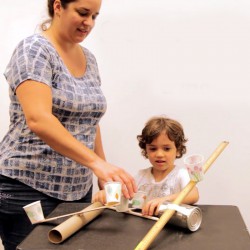
Levers at Play
New activity
Participants consider how a simple machine, a lever, turns a small push or pull (a small force) into a larger — or stronger — push or pull (a larger force) — and apply the concept to designing a model seesaw.
Open Activity
How-to Video
Implementation Guide
Provides extensive background information, facilitation outline, materials shopping list, extended supporting media suggestions, correlations to national standards, and more.
Teacher's Guide
Provides classroom connections, key concepts, connections to science standards, and additional resources.
-
Rating
-
Participants Enjoyed the ActivityParticipants Learned from This ActivityActivity Instructions Were Clear and Easy to FollowWould Recommend
Related Programming Resources
| Related Links |
Playful Building Presentation
How Does a Pulley Work? Simple Kitchen Levers Simple Machines Simple Machines with Sid the Science Kid CHALLENGE: Simple Machines Our World: Science in the Circus |
| Originating Source | Lunar and Planetary Institute and National Center for Interactive Learning |
| Related Books [Suggest a book] |
How do you lift a lion? by Robert E Wells
On the seesaw bridge by Yūichi Kimura Hop! plop! by Corey Rosen Schwartz, Tali Klein and Olivier Dunrea |
Reviews
Lots of room for experimentation
This activity could go on for quite a while, if you have a large variety of starting materials. Encouraging them to play with a variety of arm lengths and fulcrum sizes kept them engaged and experimenting even after we'd started clean-up. Participants were instantly captivated by how much impact relatively small adjustments can make, and wanted to keep optimizing. The project of designing an adjustable and/or more universally usable seesaw was quite motivating and instantly applicable to experiences many have had.
We also accidentally discovered just how much fun can be had if you can set up an area where participants can safely lift each other. A very small, stable fulcrum and a 2x4 can be set in an open area, especially if there can be an adult available for help in steadying kids, or a bar they could use to stabilize themselves. They also found it amazing to be able to lift an adult in the same fashion with some thought to positions.
Not as engaging as I'd hoped, but a good additional activity
I used this activity for a library program that included two other activities from the Playful Building curriculum (Design a Park and Team Machine). This event had students as young as Kindergarten up to 6th graders. The parents were present and also participated in all the activities. We had about 12 people total participating and this activity took about 15 minutes.
The first thing I did with the kids was make sure they knew what a see-saw was - not too many parks in our area have them! I used a 2x4 and a cinder block to make a large lever to use for a demonstration. I had the smallest child in the room come up to the front and try to lift a very heavy box of books. I then had the child use the lever to lift up the books. I then showed them the slides in the Playful Building Presentation that showed the parts of a lever and introduced the challenge (slide #22 and #23)
I supplied the kids with items we had on hand: paint stirrers, paper cups, masking tape, small rocks, empty cans and bottles, cardboard tubes, craft sticks, and a selection of wooden blocks from our pre-school area. The kids worked with their adults to design a see-saw that would work best for a kid and an adult to play on together. Most used different sized rocks or blocks to represent the different sized people and tried several of the materials to design and then re-design their see-saw. I was surprised that this activity didn’t hold their attention as well as Design a Park, and a few kids hurried through their see-saw design so they would have some extra time to work on their parks.
This activity didn’t cost us anything because we used items that we found around the building. Overall, the three activities (Team Machine, Design a Park, and Levers at Play) made a great library event that last about 60 minutes total. I made sure to have a selection of books on simple machines and other STEM related titles for the kids to check out after the event was finished.